Serverless Firefighting: Deliver Emails to Slack using Mailgun & Google Cloud Functions
5 min readThe idea was quite simple: I wanted to forward alarm emails to a Slack channel of our voluntary firefighter department. Such an email looks like this one below (sorry, it is in German ;) ) and has a PDF file attached:
Einsatzbeginn Uhrzeit/Datum: 25.04.2018 09:25 / Einsatznr.: 123456
******************************************************************

EINSATZORT:
PLZ - Ort:             ***
Strasse HNr.:          ***

alarmierte Ressourcen
BF THF
FF Hötting Sammelruf
FF Hötting Florian
FF Hungerburg Sammelruf
FF Hungerburg Florian
*****************************************************************
EINSATZTEXT:
Einsatzcode: FW-B-VERKEHR
Einsatztext: Fahrzeug über Straße hinaus

Verkehrsunfall, Unfallhergang, PKW, in Graben/Grube, 1 Verletzter,
keine Personen bewußtlos/schwer verletzt, keine Person eingeklemmt,
keine Kinder verletzt, keine brennenden Fahrzeuge, keine Gefahrstoffbeteiligung
And the result in the Slack channel should look like this:
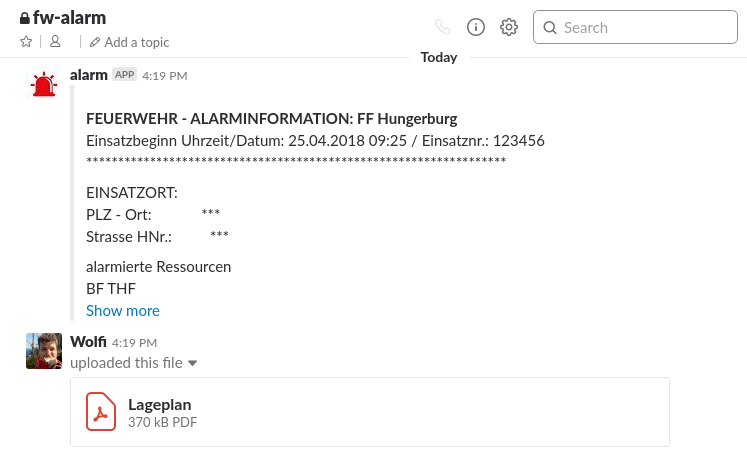
Information in Slack parsed from the alarm email
I didn’t want to spend too much time and keep maintenance costs low, so, I decided to go for a simple serverless approach and combine some (free) services to do the job. The idea was to use the following pipeline:
- Receiving the emails by using Mailgun’s Inbound Routing (Docs Routes) and triggering an API call to deliver the email
- The Mailgun Routes service calls a Google Cloud Serverless Function (Docs GCP functions) which digests and processes the content of the email
- The GCP function consisting of a couple of JavaScript lines triggers a Slack API call to send the information and the file contained in the original email
Mailgun’s Inbound Routing
The setup is quite straightforward and well documented, you just have to add some DNS entries to verify your (sub)domain at Mailgun to be able to receive emails. After this step you can create a simple route which triggers the call to your GCP function.
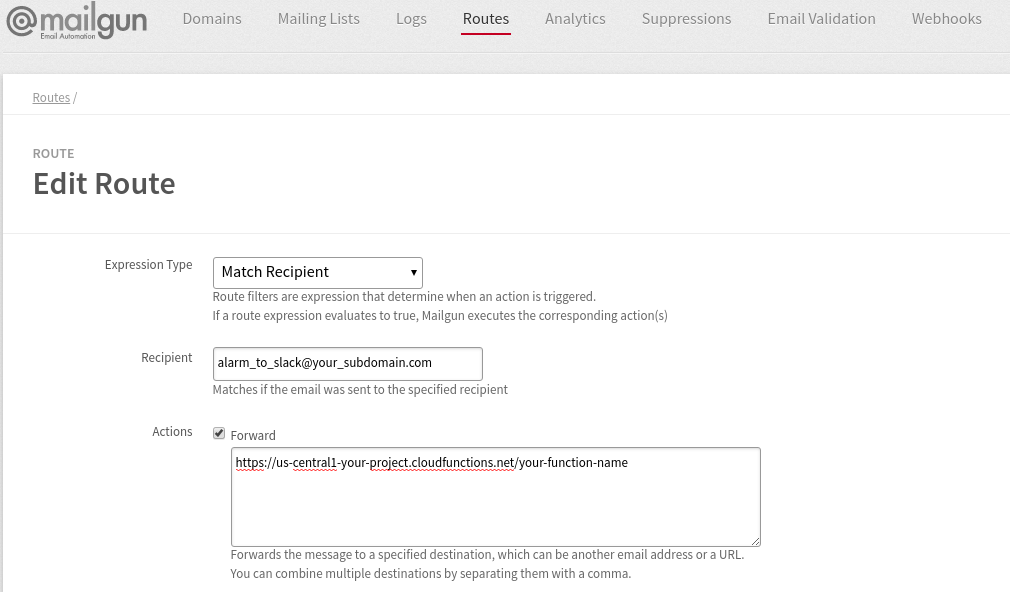
Definition to forward emails to your GCP function in Mailgun admin panel
Google Cloud Serverless Function
The setup of a GCP function is also straight forward and just needed a few clicks as shown in the screenshot below.
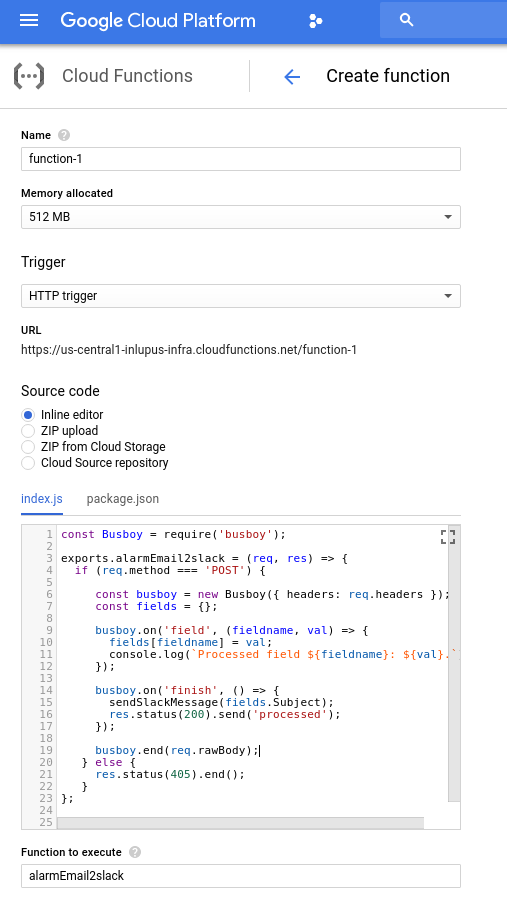
Creation of new GCP function including the source code
I strongly recommend to use the local GCP function emulator to develop your function as every deployment/change of the function online takes a minute and online debugging is a pain. The usage of the local emulator looks like this:
$ ls
index.js package.json

$ cat package.json
{
  "name": "alarm-email2slack",
  "version": "0.0.1",
  "dependencies" : {
    "@slack/client" : "*"  ,
    "busboy" : "*"
  }
}

$ functions deploy alarmEmail2slack --trigger-http
Copying file:///tmp/tmp-2330mlkOkj5AkU0e.zip...
Waiting for operation to finish...done.
Deploying function......done.
Function alarmEmail2slack deployed.
┌────────────┬─────────────────────────────────────────────────┐
│ Property   │ Value                                           |
├────────────┼─────────────────────────────────────────────────┤
│ Name       │ alarmEmail2slack                                │
├────────────┼─────────────────────────────────────────────────┤
│ Trigger    │ HTTP                                            │
├────────────┼─────────────────────────────────────────────────┤
│ Resource   │ http://localhost:8010/1/us-central1/alarmEmail2slack
├────────────┼─────────────────────────────────────────────────┤
│ Timeout    │ 60 seconds                                      │
├────────────┼─────────────────────────────────────────────────┤
│ Local path │ /tmp/alarm-email2slack/src                      │
├────────────┼─────────────────────────────────────────────────┤
│ Archive    │ file:///tmp/tmp-2330mlkOkj5AkU0e.zip            │
└────────────┴─────────────────────────────────────────────────┘

$ curl -X POST http://localhost:8010/1/us-central1/alarmEmail2slack
-F "body-plain=text from your email"
-F "Subject=ALARM Subject"
-F "attachment-1=@additional_file.pdf"
-F "From=email@address.invalid"
Furthermore, you can easily access the logs (you can write to the log by using console.log()) by calling $ functions logs read or directly accessing the log file, e.g. tail -f /usr/lib/node_modules/@google-cloud/functions-emulator/logs/cloud-functions-emulator.log (you find the location of your log file by calling $ functions status).
The biggest pain: Connecting Mailgun and Google Cloud
Surprisingly, the hardest task that took me a while, was to make the connection between Mailgun and the GCP function work. Unfortunately, Mailgun doesn’t use a json payload but sends the parsed email data as a content-type: multipart/form-data payload which makes debugging and local testing a bit harder. I tried to capture a real mailgun request and use it as a test locally but it didn’t work out for me. So I just used an artificial test case using curl and manually created -F form parameters (see curl command above). Furthermore, I encountered a very strange behavior when using busboy for parsing as recommended by the GCP docs. In all documentations, there is a final call to pipe the received raw data to busboy for parsing: req.pipe(busboy). Using this call in the emulator works like a charm but when using it in the live environment online in GCP, busboy doesn’t trigger any events. I didn’t dive deeper as it took me already a while to encounter the problem (maybe an issue with versions?). So if you encounter the same problem, just switch to the statement busboy.end(req.rawBody) which I found after some research in an old documentation. But be aware, the alternative statement doesn’t work in the emulator. So for me, it was impossible to use the same code in the emulator and online in GCP.
Finally, call the Slack API
After parsing all the data, we can finally call the Slack API to send the message containing the parsed email content. For that, I used the JS Slack client library which is well documented and also worked as expected. If you just want to transmit a message you can use a Webhook. As I also want to deliver files contained in the email, I have to use the Slack Web-API client which requires a Slack App. But no worries, you can create an App for your workspace in less than a minute.
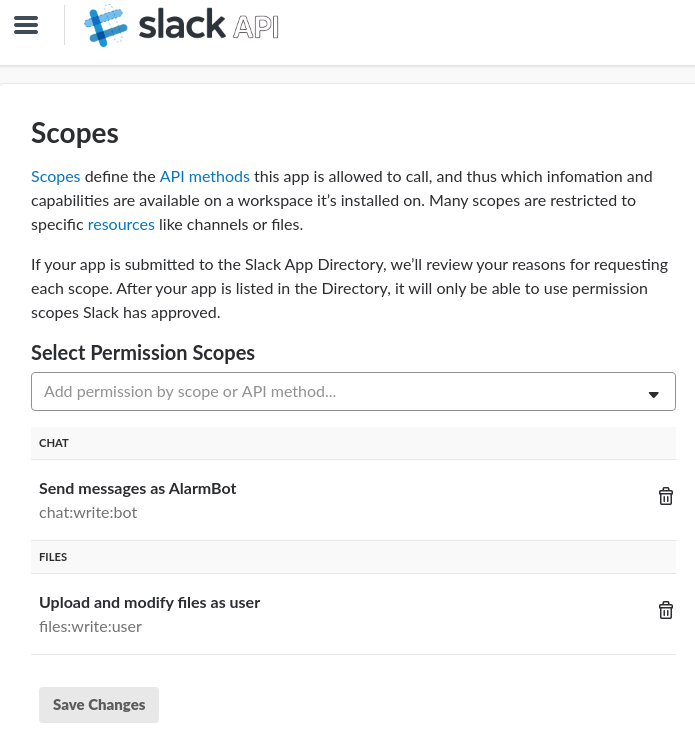
Create a Slack App and grant needed permissions
After you granted some permission (see screenshot below), you can use the token to send messages:
const { WebClient } = require('@slack/client');
const web = new WebClient(token);

const sendSlackMessage = function(subject,msg) {
    web.chat.postMessage({
      channel: channel,
      username: username,
      "attachments": [
          {
            text: msg,
            fallback: subject,
            "author_name": "Operator",
            title: subject
          }
        ]
    }).then((res) => {
        console.log('Message sent: ', res.ts);
    }).catch(console.error);
};
Using the command below, you can send a file to Slack. Unfortunately, files are always bound to real Slack users. Thus, you can use the created Slack app to send the file but it is using the connected username to do so. You can see the result in the first screenshot of Slack at the beginning of the article. The file was sent by my user while the alarm message was sent by the app user.
web.files.upload({
  filename: 'Nameofthefile',
  file: fs.createReadStream(uploads[filename]),
  channels: '#channelname'
});
You can find the full source code of the GCP function in a gist, but please be aware, this is just a quick and dirty proof of concept and not very error-prone! If you really want to use it in production you will have to invest some love and improve the (code) quality ;)
Why I wrote this? It took me just too long!
I was surprised how bad the documentation of Mailgun and GCP functions is and it seems, that the combination of Mailgun and GCP functions for incoming emails is not very popular, at least, I couldn’t find a lot of material online. Furthermore, I encountered a lot of issues with the combination of all the services, whereas every single service itself is quite easy to handle. I estimated a couple of hours for the proof of concept but at the end, it took me a couple of evenings. So hopefully, this article decreases your time to build similar pipelines.